

So, you've assembled your materials.
Paint? check. Brushes? check. Paper? check. Water? check.
It's time to dive in with a little painterly exercise to get comfortable with watercolor.
Today is all about washes, which are essentially transparent glazes or
layers that you can build upon to create your paintings.
Honestly, I don't consciously think about what I'm doing when I'm painting.
I'm not pondering what type of washes to make, for me, painting is an intuitive process.
However, I wanted you to see what different washes look like and how to achieve them.
I would recommend using a large brush to paint washes. A round, oval or mop brush will do.Get a stack of paper, lots of water and mix up a big soupy pool of paint on your palette.
Choose a color that you love. Remember to use enough paint so that you have a nice rich color.
Don't be afraid of the water, this is watercolor after all!
Flat Wash
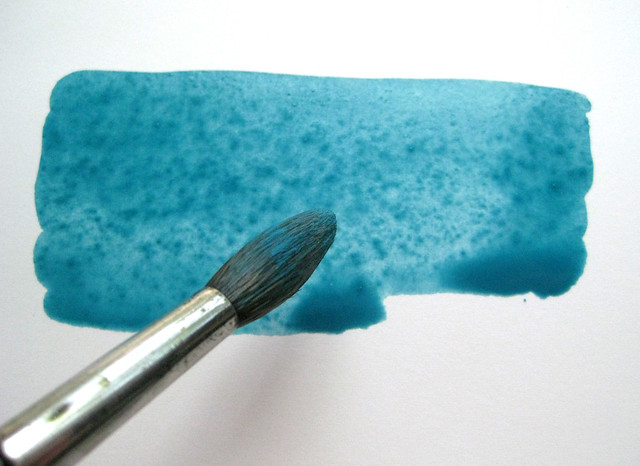
Charge you brush by rolling and swirling it through your paint until it's loaded up sufficiently.
Prop you paper on an ever so slight angle and create horizontal strokes across the paper,
the paint will naturally flow downward and pool or bead along the bottom edge.
Repeat each stroke across pulling that bead into your next brush stroke.
Recharge your brush with more paint when necessary and keep repeating until you have
created a large rectangle. Try not to go over the same area twice.
Wick away that last bead of paint by blotting your brush dry and drawing off
the excess paint so that it doesn't backwash. Set your paper down and let it dry.
You should have a fairly even, flat wash covering your paper.
Graded Wash
Mix a slightly deeper, darker color on your palette.
Charge you brush by rolling and swirling it through your paint until it's loaded up sufficiently.
Prop you paper on an ever so slight angle and create a horizontal stroke across the paper,

Charge you brush by rolling and swirling it through your paint until it's loaded up sufficiently.
Prop you paper on an ever so slight angle and create a horizontal stroke across the paper,
the paint will naturally flow downward and pool or bead along the bottom edge.
Don't add more paint. Instead, dip your brush into clean water each time you stroke across the paper.
Adding water naturally dilutes the intensity of the color and creates a graded wash.
The watercolor will flow downward from dark to light.
Again, wick away that last bead of paint by blotting your brush dry and drawing off
the excess paint so that it doesn't backwash. Set your paper down and let it dry.
Wet into Wet Wash
Wet into Wet Wash
Follow the steps from the flat wash above.
While the paper is still wet, disperse the same color or introduce new colors
randomly into the wet paint and let it the paint flow in all directions.
Soft, billowing washes are created this way.
Set your paper down and let it dry.
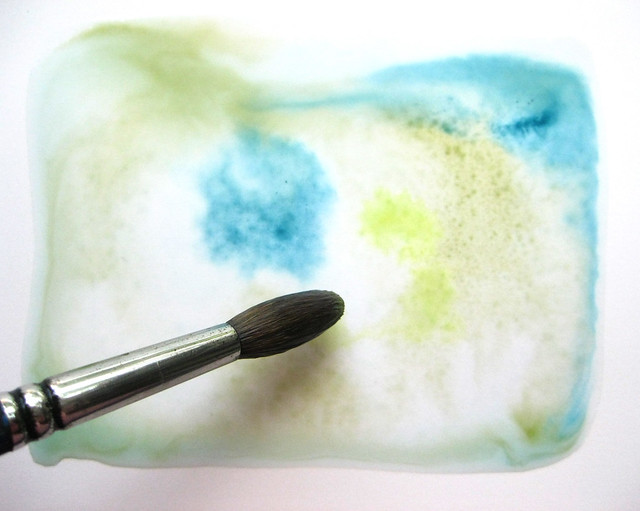
Dispersed Wash
While the paper is still wet, disperse the same color or introduce new colors
randomly into the wet paint and let it the paint flow in all directions.
Soft, billowing washes are created this way.
Set your paper down and let it dry.
Dispersed Wash
The dispersed wash is very similar to the wet into wet wash,
only you start with clean, clear water washed over your paper.
When the paper is very wet with clear water, flow random strokes of paint into it.
Let the paint swirl, blend, and disperse in all directions.
Tip and move the paper around to further blend the paint.
When you like what you see, set it down to dry.
***
Wait for your washes to dry. I can't stress this enough.
Wait for your washes to dry. I can't stress this enough.
If you don't wait with watercolor, you will often be faced with a murky, muddy mess.
Knowing when to stop gets easier as you get more comfortable with the medium.
Less is always more with watercolor. So my advice is to wash and wait.
Knowing when to stop gets easier as you get more comfortable with the medium.
Less is always more with watercolor. So my advice is to wash and wait.
These basic washes can be combined and layered, so have fun experimenting!
If you have anything to add or have questions about washes, do post comments below.
Next time 101 is all about mark making and brush strokes.
If you have anything to add or have questions about washes, do post comments below.
Next time 101 is all about mark making and brush strokes.


12 comments:
I usually am the one ending up with a muddy mess so this lesson has been very helpful :) Thank you! I'm going to go practice now...
Pheobe: Have fun painting. I have made many a muddy mess over the years!
This is wonderful! I love all of the unexpected surprises you can get with watercolour (and a bit patience) Thanks for sharing! :)
A great little tutorial on washes and glazes! I love the experimental side of watercolour.. you never know what you are going to get, it's loads of fun :)
Meghann & Lamina: So true. Expect the unexpected. You will have lots of happy accidents with watercolor.
I'm a huge fan of both your work & subject matter ! I'm so thrilled with your watercolour tutorials. thank you
Susan: My pleasure!
Yay! Love seeing another tutorial. I bought my brushes! I am so excited.
Elisa: That's super! Have fun!
Hi Holly,
I've been without internet for almost a week so I am just catching up. Your tutorial on "Wash and Wait" is great. Love the combination of colors that you've chosen for your lesson.
Wish you were on You Tube.
Artist: A week? Ah, it's good to have a little internet vacation and unplug every once in a while. Glad you liked the post!
How refreshing to find someone who doesn't want to keep their knowledge all secret! I have just started watercolour this year and it is a big mystery - so finding your blog was like having a giftwrapped 'how to book' straight from cyberspace. Thanks.
Post a Comment